
This is how I make a Baron II Pen.
I can't stress enough the importance of grain matching your pens. It only take a few seconds during the blank preparation process and a few simple step to repetitively get the grains to match. I always get complimented by the gallery owners and jewellers on how the grain match up. It shows to your customers that the pen has been well made and that you have thought through the pen making process.
Step 1: Pen blanks - preparing them for the drill press.
Step 2: How I drill out my blanks to produce better grain matched pens.
Step 3: How I glue up and square the cheeks of the pen blanks.
Step 4: Rough turning the pen.
Step 5: Sanding the pen barrels.
Step 6: Applying 20 thin coats of CA as a finish.
Step 6A: Applying 20 thin coats of CA using Glen 20 as a finish.
Step 6B: Applying 20 thin coats of CA using the Super Tight Ass Method.
Step 7: Final buff to get a high gloss finish.
Step 8: Final work before assembly.
Step 9: The final step - assembly.
Step 1: Pen blanks - preparing them for the drill press.
In this video I prepare some blanks for some Barons for glue up.
The way I prepare my pen blanks is I always try to match the grain of the pens when I’m assembling my pens. I go through a few steps prior to cutting and drilling the pen blanks.
- I mark the blanks where the cuts are to be made on the band saw (5 - 10mm longer than the brass tube length).
- I mark a line to join the 2 halves of the blank so that when I put it on the lathe I can keep them in order.
- I mark the type of pen that I am drilling and gluing the blank for.
- I mark the short and the long side of the blank.
- I give each pen blank a unique number so the two halve can be easily identified in the rare occasion I drop my draw of pen blanks and all the blanks get mixed up.
- I then use the band saw to cut the blanks to the appropriate length.
Keeping the grain matched on the assembled pen is very important because it shows that you have taken the time and put the effort in to create a fine writing instrument. The gallery owners and especially the jewellers always comment on how my pens look like they have come from a single piece of wood. My reply is always “it looks like it came from a single piece of wood because it did come from a single piece.”
A few second invested prior to cutting and turning will pay dividends on your hand made fine writing instrument.
Step 2: How I drill out my blanks to produce better grain matched pens.
After cutting the blanks on the band saw, I line up the blanks and I start drilling the holes for the brass tubes. I always start with the larger diameter holes, that way if I stuff up, I can recover the other half for a smaller pen like the Sierra or Elegant Beauty.
When it comes to drilling out the blank, I always put the marked side with the center of the blank facing up on the press. The reason for this is because if there is a chip-out on the push through, we loose a bit on the end of the pen and not the centre of the pen. This helps with the grain match up on the pen. If we lose too much from the centre of the blank, the grains just don't look as good. I anticipate the chip-out, that is why I always allow the 5 - 10 mm so we don't waste the pen blanks.
The drill bit that I use is just a standard twist drill bit. I always sharpen my drill bit before a run of blanks. I use a Drill Doctor to give me a sharp cutting edge - the Drill Doctor is quick, in 30 seconds I have a nice sharp drill.
I don't use a brad point drill bit because because they are difficult to sharpen. Unless your a very skilled trained professional or have an expensive sharpening machine, their next to impossible to sharpen. The same is true with the parabolic dill bit. Parabolic bits also seem to flex and wobble very easily, the bit likes to follow the grain of the timber resulting in far higher stuff up when it comes to drilling the smaller sized blanks.
Step 3: How I glue up and square the cheeks of the pen blanks.
When gluing up, I set myself up over a rubbish bin – that way all the surplus glue drips into the bin rather than all over the floor. I use thick CA to glue my brass tubes into the pen blanks.
I prepare the tubes by sanding the brass tube with 80 grit sandpaper so there is a mechanical key for the glue to hold onto. I use the thick CA and squeeze a generous amount of it into the blank, and then I use a cotton bud to spread it evenly around the blank. Then I get the brass tube and insert it into the blank in a circular motion, in and out of the blank. I push the brass tube in 2mm underneath the surface of the centre of the blank. That way we trying to reduce the wastage we loose from the centre of the blank.
Before hitting the sand paper, I go back to the band-saw to cut of the 5 – 10mm on the back of the tube.
To clean and square the cheeks, I use a disc sander. Using a disc sander is much less work that using a pen mill. I push the blank onto the sander then keep rotating the blank until I hit the brass tube.
Once this process is complete, the blank is almost ready to go onto the lathe.
After gluing, I generally leave the blanks to cure for 5 – 7 days. The 5 – 7 days allow the glue to go hard brittle. If the glue is still soft and not fully dry, the glue will clog up the sand paper in the disc sander.
Step 4: Rough turning the pen.
Once I have squared up the cheeks on the disc sander, to clean out the inside of the blank is quite easy. I use a sharp pointed tool and press on where the CA meets the brass tube. A bit of pressure will separate the two.
Using a disk sander to square the cheeks of the blanks will put a burr around the inside of the brass tube which will make it hard to assemble the pen kits, I use a bit of 120 grit sandpaper curved into a cone to take away the burr and put a bit of a chamfer to held with the kit assembly process.
I then use a black marker to make the inside of the brass tubes, this is so that after we have turned off all the marking on the pen blanks we can identify how the pen blank should line up.
When you put the blanks onto the pen mandrel for turning, don't over tighten the brass nut or the tail stock. Over tightening either of these will bend the mandrel rod.
I use a 3/4" roughing gouge for most of my pen turning. It's good turning practice to turn into the centre rather than from the centre out. Turning out from the centre increases the chance of chipping out a bit of the cheek of the blank.
I rough turn the pen to roughly half a mill more than what the finished dimensions of the barrels should be. I will stop the lathe and check with a set of digital callipers. From past experience, I know that I roughly take off 0.8mm with the sanding process and the CA finish that I normally apply will put on another 0.3 - 0.4mm. You should keep accurate records of what you normally put on and take off, everyone has different pressures and practices - over time with good record keeping you will work out what best works for you.
Next video - Sanding and putting on the CA finish.
Step 5: Sanding the pen barrels.
After turning the blanks down to 0.5mm more than the finished diameter, I start the sanding process. I like pens with straight barrels because I find them more classy, but more importantly over the years, I find that they sell faster than other variants with fatter grips or big curves.
I start the sanding process with 80 grit sand paper. I work through the grades of sand paper from 80 grit, 120, 180, 240, 320 then 400 grit. In this video I skipped the 180 and 320 grit to save a bit of time.
On the 120, 240 and 400 grit steps, I stop the lathe and sand along the blank to remove the circular sanding patterns that you get from sanding with the lathe on. This is very important on the 240 grit step because is there is any circular sanding patterns left by the 80 grit sandpaper, it will show up on your finished pen.
Its good practice to regularly change the sand paper. I normally change sand paper after about 3 to 4 pens.
Step 6: Applying 20 thin coats of CA as a finish.
I use ordinary paper towels to apply the CA onto the blanks. With 4 squares of the paper towel I am able to complete the process. I fold the towel like demonstrated in the video. I cut them into 14 individual pieces. 10 of the pieces are used twice each = 20 coats.
You need to turn down the speed of the lathe to about 800 rpms so that you don’t flick the CA all around the workshop. To apply 1 coat of CA, all you need is 5 drops of CA. 3 drops on the 1st barrel and 2 drops on the 2nd one. I find that the first drop soaks the towel then the rest the other drops actually coat the blanks.
Super thin CA has a consistency like mentholated spirits and quickly dries. I find that Super thin CA is just too thin for this application. The towel goes hard before you even get to the second barrel. I now use and sell thin CA – it’s just a tiny bit thicker but it not too thick.
20 thin coats of CA takes about 3 – 4 mins to apply, 20 coats sounds like a lot of effort and time, but in actual fact it’s very quick. When I sell a pen, a brief information sheet is always included. There I state that I sand it with more than 10 grades of sanding and 20 coats of finish – it sounds good but it’s really not much effort.
I use the aerosol activator (accelerator) from the box of Mitre Fix CA. A quick shot of accelerator between coats is all you need.
I have done this so many times that I don’t use gloves anymore. My record for pen turning is 9 pens in an afternoon, all with this high gloss CA finish without any CA on my fingers.
Step 6A: Applying 20 thin coats of CA using Glen 20 as a finish.
As you may be aware that I have discontinued the Mitrefix product.
Part of the reason why I discontinued the product was because I have found a good substitute for the accelerator.
I have experimented with about 8 different cans and have found Glen 20 to be the best. You can get Glen 20 at your local supermarket for under $5 and the bottle is twice the size. That's quarter the price and double the size.
It seems to leaves a slight dusting of white on the surface but that is removed during the polishing process.
I have made about 10 pens this way now and it seems to produce just a good a finish as what you get with the Mitrefix accelerator.
Step 6B: Applying 20 thin coats of CA using the Super Tight Ass Method.
Ever since I have succeeded with the Glen 20 method, I have pushed the boundaries a bit with what else I could use to bring it to the next level.
Tried a few other products but had limited success.
Was feeling a bit down over the weekend, so I stuffed my face with junk food while watching a old Military Movies. I managed to do 5 movies straight. While watching the Hunt for Red October, one of the scenes got me thinking - steam! (this was 4am in the morning)
All excited and now feeling much brighter because of the new invention, I gave it a try. Success! Should of though of this much earlier.
Give it a go and let me know what you guys think about this new method.
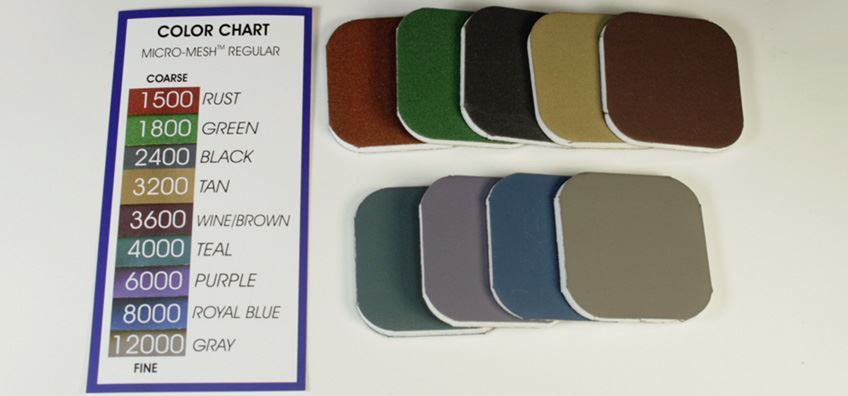
Step 7: Final buff to get a high gloss finish.
After applying the 20 thin coats of CA. I use the micromesh buffing pads to get the satin finish to bright high gloss finish.
The Micromesh pads is a great system for the final buff. These pads last a long time, I get over 50 pens for each set of pads.
I generally spend a bit more time on the 1st pad - the brown pad. This way it takes all the high spots off and smoothes all surfaces.
I use the it as a wet buff. You can see the white paste gathering on the pad, that the slurry from the CA finish.
Because I am wet sanding, after each day's turning, I give the lathe a good clean down and seal with WD40. It just keeps the rust off the lathe and any other machinery which accidental get wet.
As a final buff after the Micromesh, I use Brass for a final cut. Then a coat of automotive wax for a final layer of protection. The wax also helps with giving a much higher level of gloss on the pen. I use a pincer action to put pressure on the towel to generate a bit of heat which will make the wax go hard.
You can purchase the micromesh pads on the following link Micromesh pads
Step 8: Final work before assembly.
After you have buffed the CA finish, it's time to take the blanks off the mandrel. The coat of CA also covers the bushes as well and if we try to snap off the blanks, we run the risk of snapping off the CA finish over the pen blank.
To reduce this risk, I use a carving knife to score the CA about 1mm - 2mm from the blank over the bushings. This will blunt the knife over time but the knife can be resharpen quite easily.
Once I have taken the blanks off the mandrel, I use a piece of 240 grit sandpaper to again clean the barrel edges. Don't apply too much pressure when cleaning the cheeks because you don't want to chip the blank now.
We earlier used a felt marker to mark the inside of the barrel so we can then realign the blanks to match the grains. Once this is done, were ready for assembly.
Step 9: The final step - assembly.
The final step of making a pen is the assembly process.
Most people simply press the parts together and leave it at that. I prefer to use a bit of 2 part epoxy to hold the pieces together. All the commercial high end pens are held together this way and we should be no different.
You will find that a pen which has been pressed fitted together, which had a snug fit will eventually over time come apart. When I first started making pen, I didn't use any glue to hold the parts in. Pens made from all 3 major suppliers did eventually come apart. It's very good practice to assemble you pen kits this way.
I actually prefer that the pen kits be a bit loose rather than too tight. This is because I know the glue will hold the pieces together. With a tight fit, you run the risk of cracking the pen blank during assembly. With a loose fit and a bit of glue, you have almost zero chance of cracking the blank.
When it comes to assembling the parts, I lay the pieces out on bench with the barrels of the pen in alignment and the pieces in the proper order. I mix a small amount of 2 part epoxy ready for the glue up.
I always start with writing end of the pen. The nib assembly and the end cap goes on first. I use a home made pen press to press the parts together. The home made pen press is made using a piston toggle clamp and a block screwed in on the other end. Once pressed together, I then unscrew the nib assembly and insert the rollerball refill.
Once pressed together I then move onto the cap half. I start with the clip and press that on. Once that has been pressed in, the last piece is the centre band coupler piece. I screw the centre band coupler onto the writing half then align the barrels. When the grains are matched up, I then push the barrel on by hand to get the press started. I then finish the press on the bench vice.
Once this is all done, you have finally completed the pen.